To automatically reset a user account in Ubuntu (which means removing user files and resetting user settings on every login) to default can be done by following a step that involves removing the user home directory on boot and then re-creating it.
All user files in the home directory, such as extensions, personal app data, and browsing history, will be completely wiped out, requiring the user to set up the account again on every login.
It could be useful if multiple random users are using a public computer, as removing and re-creating the user home directory on Ubuntu without any leftover files at every login makes it seem like the account is newly created.
So, to manually reset a user account and settings on Ubuntu for a single instance, open your terminal and execute the following command:
$ sudo rm -rf /home/<username>
$ sudo mkhomedir_helper <username>
However, to automate resetting user accounts and settings on Ubuntu for every instance, follow the methods below with another administrator account.
Step 1: Automatically Remove the User Home Directory on Boot
Most popular Linux distributions such as Ubuntu, Debian, Linux Mint, Fedora, and Red Hat use Systemd, which includes the systemd-tmpfiles service that can automatically create, remove, and perform temporary file cleanup in Linux.
Open your terminal and create a new file at "/etc/tmpfiles.d" named "remove_home_dir.conf" using your preferred GUI or CLI text editor; I prefer Nano.
$ sudo nano /etc/tmpfiles.d/remove_home_dir.confThen, copy-paste the following line into the file and remember to replace <username> with the actual user whose account you want to delete.
📝 Note
Run the sudo ls /home command to list all the user's home directories.
#    Path                  Mode UID  GID  Age Argument
R    /home/<username>       -    -    -    -    -
Output:

Once done, save and close the file. Now, the systemd-tmpfiles systemd service will delete the user home directory on every boot.
Step 2: Create a Script to Recreate the User Home Directory
To recreate the user home directory with default files and settings, you'll need to create a script that includes the mkhomedir_helper command.
$ sudo nano /usr/local/sbin/create_home_dir.shNow, copy and paste the following lines, and make sure to replace <username> with the appropriate user for whom you wish to create a home directory.
#!/bin/bash
mkhomedir_helper <username>
Output:

Save and close the file, and then make the script executable.
$ sudo chmod u+x /usr/local/sbin/create_home_dir.shOutput:

Step 3: Systemd Service to Auto Run Script in Ubuntu
Now that we've created the script to recreate the user home directory, you'll need to create a Systemd service to automatically execute the script on boot in Ubuntu.
To achieve that, first create a new Systemd service file in Ubuntu with the provided command:
$ sudo nano /etc/systemd/system/create-homedir.serviceThen, copy-paste the following lines:
[Unit]
Description=Setup New Home Directory for User Account
After=systemd-tmpfiles-setup.service
After=systemd-tmpfiles-setup-dev.service
After=systemd-tmpfiles-clean.service

[Service]
Type=oneshot
ExecStart=/usr/local/sbin/create_home_dir.sh

[Install]
WantedBy=multi-user.target
Save and close the file, and execute the following command to enable the service.
$ sudo systemctl enable create-homedir.serviceOutput:

That's it. You can now restart your system to see the changes.
If you want to preserve some files that you don't want to delete, then you can use the "/etc/skel" empty directory that houses some hidden files, such as .bash_logout, .bashrc, and .profile. This directory provides the backbone, or skeleton, of what your new account would look like.
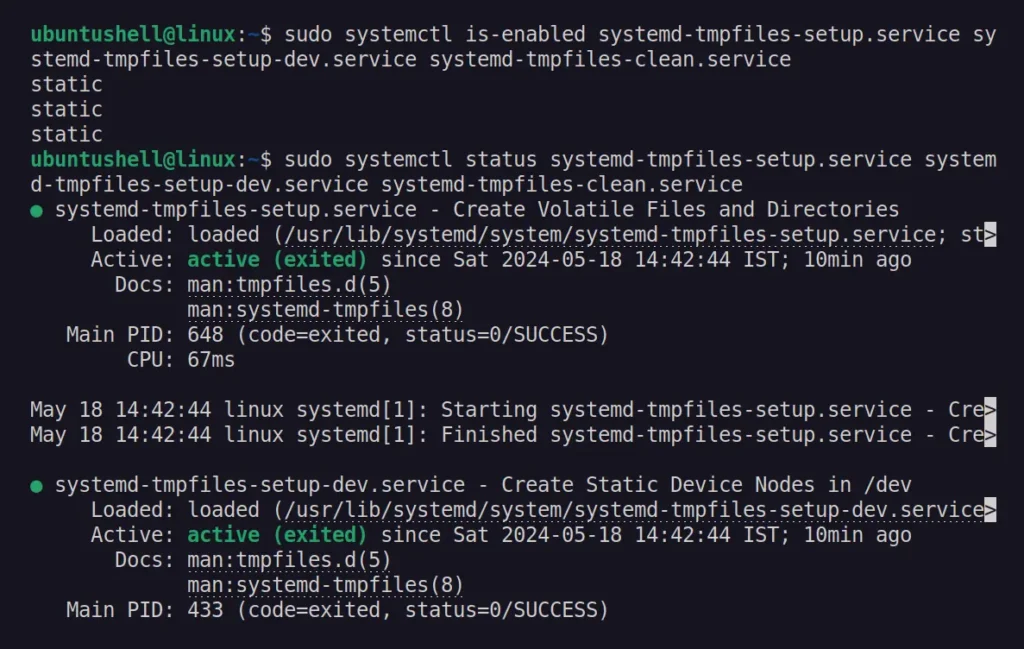
If the desired user account fails to reset in rare instances, ensure that the following three Systemd services are enabled and running:
$ sudo systemctl is-enabled systemd-tmpfiles-setup.service systemd-tmpfiles-setup-dev.service systemd-tmpfiles-clean.service
$ sudo systemctl status systemd-tmpfiles-setup.service systemd-tmpfiles-setup-dev.service systemd-tmpfiles-clean.service
Output:
If the service is disabled and fails to start at boot, then execute the following command:
$ sudo systemctl enable systemd-tmpfiles-setup.service systemd-tmpfiles-setup-dev.service systemd-tmpfiles-clean.service
$ sudo systemctl restart systemd-tmpfiles-setup.service systemd-tmpfiles-setup-dev.service systemd-tmpfiles-clean.service
Revert Changes
To undo all the changes back to their original state, first disable the Systemd service.
$ sudo systemctl disable create-homedir.serviceThen remove the created Systemd service file.
$ sudo rm /etc/systemd/system/create-homedir.serviceFinally, remove the config and script files that remove the user home directory, and then re-create it on boot.
$ sudo rm /etc/tmpfiles.d/remove_home_dir.conf /usr/local/sbin/create_home_dir.shThat's it!


