In this article, I'll show you a clear and concise way to set up Fail2Ban on Ubuntu 25.04 to automatically block brute-force attacks on the system performed via SSH.
What is Fail2Ban?
Fail2Ban is a Python-based utility that needs to be installed manually on the system. It helps protect the system from network-related attacks, such as brute force.
When this kind of attack occurs, Fail2Ban waits for the declaration of specific rules in the configuration files to trigger before taking the required action, such as blocking the target IP address and logging the incident.
The restriction on the target IP address is lifted again according to the rules specified in the configuration files, stored in "conf" format at the "/etc/fail2ban/" path.
In this tutorial, I'll guide you on how to install and configure Fail2Ban on Ubuntu 25.04 and set it up to prevent brute-force attacks.
Step 1: Install Fail2Ban
First, we should ensure that the package list and package database are up-to-date.
$ sudo apt update && sudo apt upgrade -yNext, we can proceed to install Fail2Ban using the APT package manager.
$ sudo apt install fail2banOnce the installation is complete, you can verify it by checking its version.
$ fail2ban-server --version
While following the tutorial, if you encounter any issues, be sure to mention this version information in the comment section.
Step 2: Configure Fail2Ban
Fail2Ban configurations are stored in the "/etc/fail2ban" directory, with some config files grouped in the "action.d", "fail2ban.d", "filter.d", and "jail.d" directories, while important config files such as "fail2ban.conf", "jail.conf", and "jail.local" reside in the parent directory.
We will primarily focus on modifying the "jail.conf" file to configure Fail2Ban for brute force prevention. So, what does this file contain? Well, it includes the default jail configuration for various services, such as SSH.
We usually don't make our modifications directly in this file. Instead, we create a copy in the same directory named "jail.local" and make our changes there. So, let's quickly create the copy using the following command:
$ sudo cp /etc/fail2ban/jail.conf /etc/fail2ban/jail.local
Next, we will modify this configuration file as per our requirements using our choice of text editor (I prefer Nano).
$ sudo nano /etc/fail2ban/jail.localOnce the file is opened, locate the [SSH] directive, which is often commented using the # prefix, so make sure to remove it and then copy the following content below it.
📝 Note
When copying the content, ensure it doesn't already exist. Otherwise, remove it to avoid conflicts.
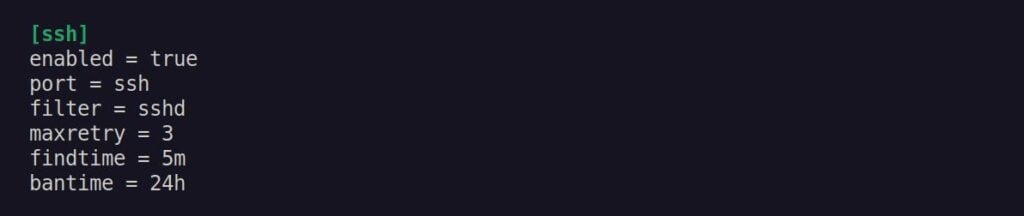
[ssh]
enabled = true
port = ssh
filter = sshd
maxretry = 3
findtime = 5m
bantime = 24h
Here, ensure that it's the [SSH] directive and not [SSHD]. Otherwise, you need to rename it [SSH]. Next, the configuration that we pasted is explained in a simple manner below.
enabled = truemeans the configuration is set to active.port = sshandfilter = sshddefine the service name.maxrety = 3defines the maximum number of failed login attempts allowed before banning the IP address (e.g., 3 means three attempts).findtime = 5mspecifies the time duration within which the condition must be met (e.g., 5m means the user must fail to log in three times within five minutes for the action to be taken).bantime = 24hdefines how long the IP address is banned (or blacklisted), where 24h means a full day.
The configuration value is not an industry standard that you should blindly follow. Feel free to modify it according to your needs or requirements. Once you have finished editing the configuration file, it should look something like this:
Save and close the file. If you're using nano, press Ctrl+X, then Y, then Enter to save and exit.
Step 3: Restart the Service
After making the changes, we should make sure that the SSH service is running and enabled, which will allow it to autolaunch on system boot. To achieve this, execute the following two commands:
$ sudo systemctl restart ssh
$ sudo systemctl enable ssh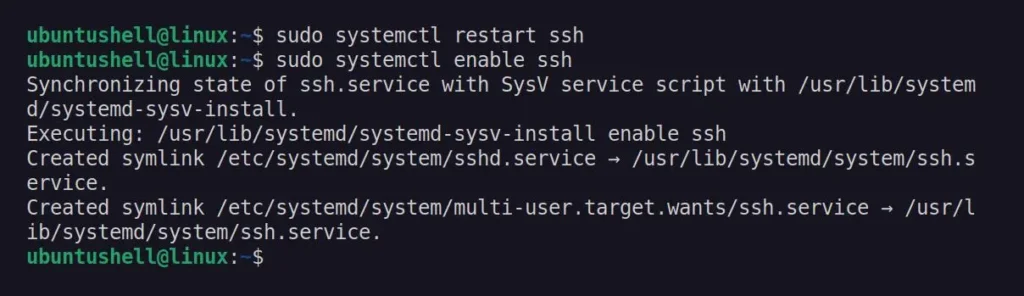
Next, we need to restart and enable the Fail2Ban service with the following command:
$ sudo systemctl restart fail2ban
$ sudo systemctl enable fail2ban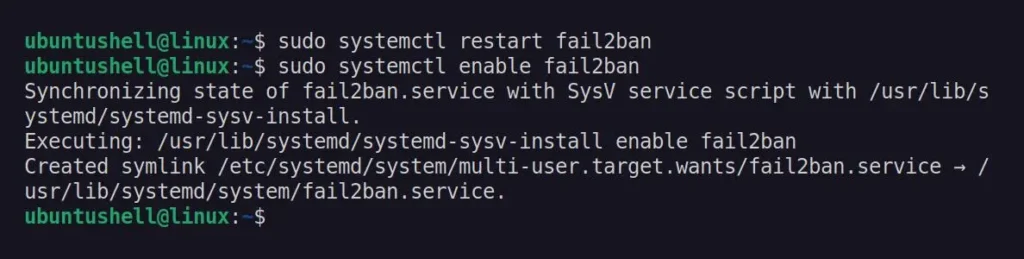
We are now ready to test whether the brute force attempt via SSH will be blocked.
Step 4: Test to Brute-Force via SSH
To test if multiple SSH attempts (or brute-force attacks) are being blocked, use your local IP address (found with the ip addr show command) and, from your local network (or the same system, which is perfectly fine), attempt to log in multiple times to the system with Fail2Ban configured until the limit is reached.
During or after the failed login attempts, you can monitor the Fail2Ban logs to see if the IP address has been banned.
$ sudo tail -f /var/log/fail2ban.log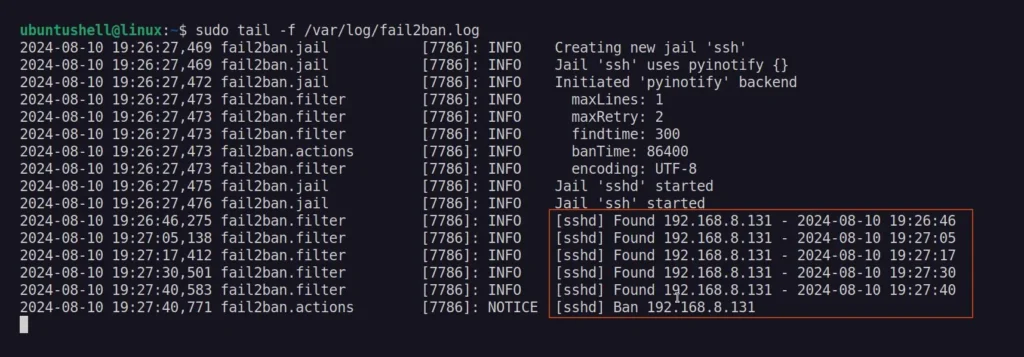
Once the IP address is banned on the user's end, the following message will appear when they attempt to log in to the system via SSH.

To unban a user's IP address from Fail2Ban, specify their IP address with the following command:
$ sudo fail2ban-client set sshd unbanip 192.168.0.101Conclusion
In this article, you've learned how to install and configure Fail2Ban to block IP addresses attempting to brute-force the system via SSH. If you have any questions related to the topic, feel free to write them in the comment section.


