At one point in your life, you might encounter a situation where you need to have two or more versions of Java on your system; the reasons could be any, such as wanting to work with the latest version of Java but encountering an application that can only run on an older version.
It's a bit of a challenging task for a beginner and irritating work for an experienced user, but there isn't a soft option other than pushing through it.
So, stick with this article until the end, as I'm about to show you a simple and easiest way to install multiple versions of Java and then make an easy switch between them via CLI and GUI.
Install Multiple Versions of Java
The first step is to find out whether you have any existing Java installed or not, which you can determine by simply running the following command:
- update-java-alternatives --list
Output:

As you can see, I already have Java 11 installed on my system, but unlike me, you might have multiple or no Java installations. In that case, you need to install at least two different versions of Java for this tutorial.
For example, I already have Java 11 installed, and to install another version of Java, I first check out the list of all available versions of Java in Ubuntu by running:
- apt list -a openjdk-*-jdk*
Output:
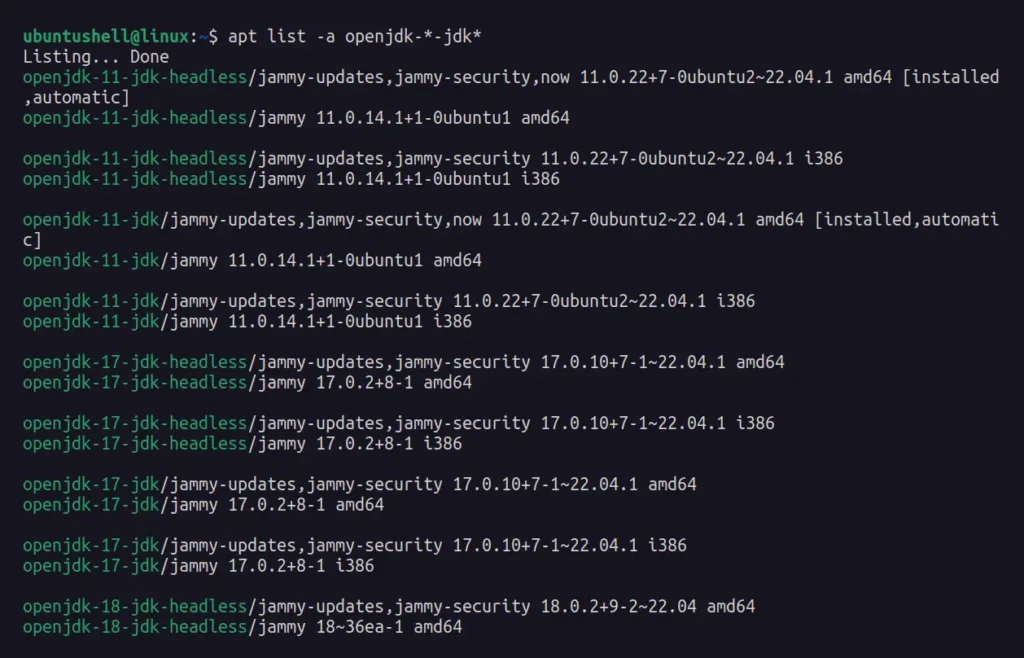
As of writing this article, there are 6 versions of Java available: Java 8, 11, 17, 18, 19, and 21.
I already have Java 11 installed on my system, so for installing an additional Java version, I've chosen Java 21, and the command for installing it will look like the one below.
📝 Note
To install your desired version of Java, simply replace the 21 in the following command with your desired Java version.
- sudo apt install openjdk-21-jdk
Now that the installation is complete, you can confirm once more the total version of Java installed on your system by running.
- update-java-alternatives --list
Output:

How to Change Java Version on Ubuntu
To change your existing default version of Java, there are two methods to do so on Ubuntu:
- Using the
update-alternativescommand-line tool. - Using the G Alternatives GUI tool.
Both methods are easy to follow, and most of the time, the command-line tool is recommended, as the GUI tool is just a front-end of the CLI tool.
So, let's begin with the command-line tool.
Method 1: Using the update-alternatives command
To change the version of Java using this method, first we will run the following command to find out the current default version of Java in use.
- java --version
Output:

As you can see, we had two different versions of Java installed, versions 11 and 21, but because Java 21 was recently installed, it has become the default choice for our environment.
To change the default Java version, whether it's Java 21 or any other, simply run the update-alternatives command with the --config flag and append java to it, as shown.
- sudo update-alternatives --config java
Output:
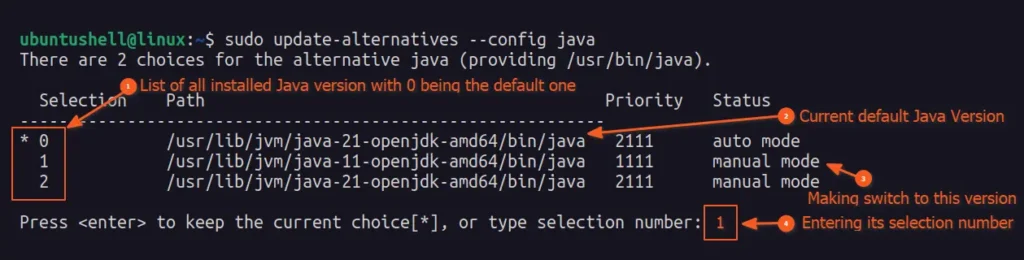
Select the desired version of Java from the list by entering its corresponding selection number to make it the default. For example, to set Java 11 as the default, I'll type and enter its selection number, which is 1.
Once done, you can verify the Java version again to ensure that your desired version is now set as the default.
- java --version
Output:

Tada!! You have successfully changed the default version of Java.
Method 2: Using the G Alternatives GUI Tool
The G Alternatives is a GUI frontend of the aforementioned update-alternatives command and works similarly to it, but this time you have a graphical interface to switch between different versions of Java.
To install the G Alternative on Ubuntu, simply use the following command:
- sudo apt install galternatives
Once the installation is complete, you can launch it by running the following command:
- sudo galternatives
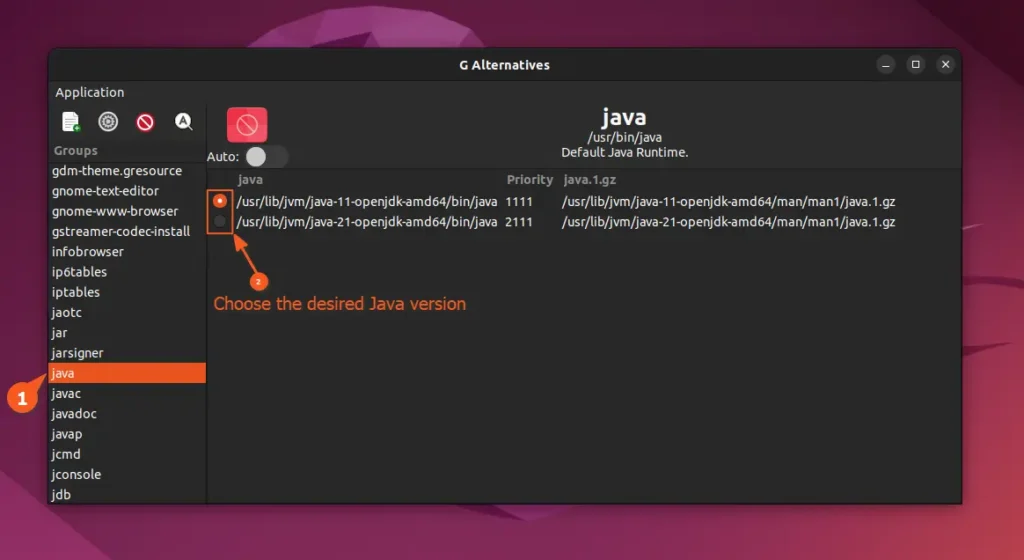
Choose Java from the Groups section (from the left pane), then select the desired version of Java you wish to set as the default from the available options.
Once you have done selecting your desired Java version, simply close the G Alternatives and verify the change by checking the Java version.
- java --version
Output:

Tada!!! You did it.
That's all it takes to switch between different versions of Java on Ubuntu. But after performing these steps, make sure to change the JAVA_HOME variable to prevent any issues while coding in a modern IDE.


