ADB (Android Debug Bridge) and Fastboot are widely recognized and popular methods among developers for managing Android devices from another machine.
It could involve installing new apps, accessing contacts, pushing or pulling files, accessing the device shell to execute commands directly, unlocking the bootloader, and installing custom ROMs.
Prior to moving forward, if you're wondering what the difference is between ADB and Fastboot, then I'll try to explain it in the simplest way possible. ADB connection can be established whether your phone is turned on or your recovery has the ADB option, while Fastboot can be easily established even if your ROM is corrupted or you're stuck in a boot loop, simply by pressing the power button together with the volume down button.
To establish either the ADB or Fastboot connection, you will need a smartphone with ADB and Fastboot support, which is quite common these days, and an ADB or Fastboot client installed on your Linux system that you will later use to connect with your Android devices via USB cable (or WiFi).
So, stick with this article till the end to learn how to install ADB and Fastboot on Ubuntu and other Linux distros.
How to Install ADB and Fastboot on Ubuntu and Other Linux Distros
These days, every modern Linux distribution has the ADB and Fastboot client packages in its repository, which you can easily install using its default package manager.
Below, I've listed the installation commands for ADB and Fastboot for nearly all popular Linux distributions.
- For Debian, Ubuntu, Mint, Pop!_OS, etc.
- sudo apt install adb fastboot
- For RedHat, Fedora, CentOS, AlmaLinux, etc.
- sudo dnf install android-tools
- For Arch, Manjaro, EndeavourOS, etc.
- sudo pacman -S android-tools
Once the installation is complete, run the following command to verify the ADB version:
- adb --version
Output:

How to Use ADB in Linux
To use ADB, you first need to have the ADB client package on your Linux system, which I assume you already have installed by following the previous step. Next, you need to enable USB debugging on your Android devices (which will later start an ADB server), which your ADB client (installed on your Linux system) uses for establishing connections.
So, to simplify the process of enabling USB debugging for a first-timer, I've broken down each step below for you to follow (remember that the position of options and naming might vary depending on your Android device).
Enabling USB Debugging on Android Devices
Pick up your phone, go to "Settings" -> "About" (sometimes also referred to as "Software Information") section, and look for the "Build number" (or "MIUI version" in Xiaomi Phones) to tap multiple times to enable developer options.
Now, you need to go to developer options, which might be listed in different places depending upon Android devices, but generally they would be in your "Settings" -> "System" -> "Advanced" -> "Developer options", or you can perform a search or look for your specific device model on the internet for assistance.
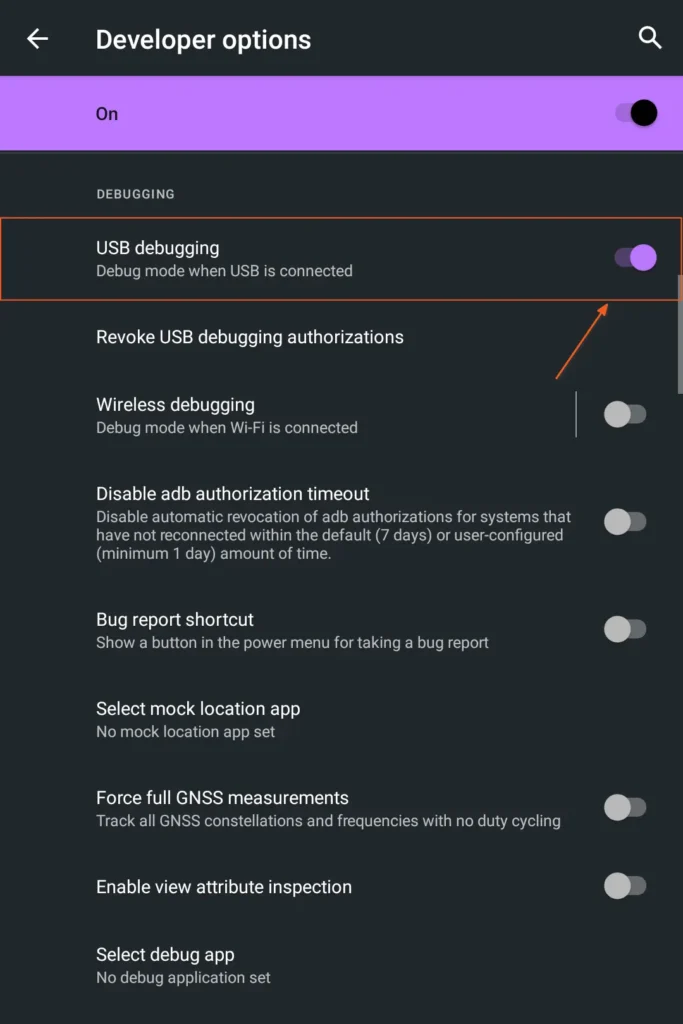
Once you're in developer options, you need to locate and enable the USB debugging option.
That's it! Now you can connect your Android devices to your Linux system via USB cable and follow the steps below.
Connecting to an Android Device via ADB
After connecting your Android device to your Linux system with a USB cable, run the following command to launch the daemon and establish an ADB connection with your Android device:
- sudo adb start-server
While establishing the connection, your Android device might display a popup titled "Allow USB debugging" for security reasons; therefore, click on the "Allow" button to proceed.
Finally, you can run the following command to confirm the device's connection:
- adb devices
Output:

That's it. Now, you can issue ADB commands to manage your Android device from your Linux system.
In the following table, I've provided a few ADB command-line syntaxes that you can use right away for experimentation.
| Commands | Description |
|---|---|
adb install <apk_name or path/to/apk> | It will install the specified APK directly on your Android system. |
adb uninstall <apk_name or path/to/apk> | It will remove the specified APK from your Android system. |
adb shell | Once initiated, it will allow you to execute shell commands such as ls, cd, pwd, etc. |
adb shell “pm list packages -u -3” | List uninstallable (or removable) packages. |
adb push Filename where/to/send/in/Android | Send the specified file, such as sample.txt, from your Linux system to your Android system, for example, to the /storage/emulated/0 directory. |
adb pull /path/to/file/in/Android /target | Download the specified file from your Android device (e.g., /storage/emulated/0/sample.txt) to your home directory (e.g., ~/). |
That's it. Now, if you have any questions related to the topic, please let me know in the comment section.


