HAProxy is a free, open-source, and robust reverse-proxy program that provides high availability, load balancing, and proxying features for HTTP and TCP-based applications, making it an excellent choice for managing high-traffic servers (or web apps) by distributing load across multiple node servers.
Since the Nginx reverse proxy also works similarly, let me shed some light on why you should choose HAProxy over it. First, it is a dedicated load balancer and reverse proxy program that offers better performance for SSL offloading, detailed runtime statistics, and more advanced load balancing features.
The only benefit of using an Nginx reverse proxy is that you can avoid the hassle of configuring HAProxy files, which may be ideal for certain situations. However, for complex environments, HAProxy would be a smart choice to rely on.
In this guide, I'll show you the steps to install and configure HAProxy on Ubuntu 25.04, but it should also work for previous versions such as Ubuntu 24.04, Ubuntu 23.04, and others.
How to Install and Configure HAProxy on Ubuntu
Before you install and configure HAProxy, you need to understand the cloud infrastructure and how you can use HAProxy as a load balancer. For demonstration, I've illustrated an imaginary scenario where a user with a laptop accesses a server with HAProxy installed and configured, which then forwards the user traffic to the least busy server.
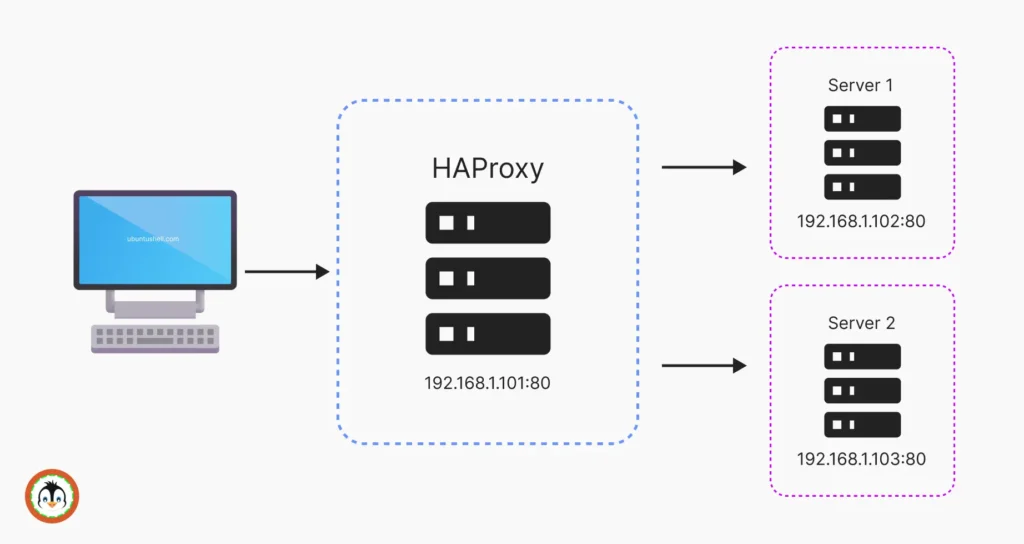
In this scenario, the server with HAProxy installed should be running on Ubuntu, with at least 1 GB of RAM, 20 GB of disk space, and 2 CPU cores; additionally, ensure you have root access or at least sudo privileges on that server.
Once you're ready, access your server via SSH and follow the instructions below to install and configure HAProxy.
Step 1: Update Your System
This is an optional step, but it would make sure your package list and installed packages are updated to their latest version.
$ sudo apt update && sudo apt upgrade -yStep 2: Install HAProxy
Since HAProxy is a popular program, it's already available in the official Ubuntu repository, and you can easily install it using this command.
$ sudo apt install haproxyStep 3: Verify HAProxy Installation
To confirm that HAProxy has been successfully installed, check its version by running:
$ haproxy -v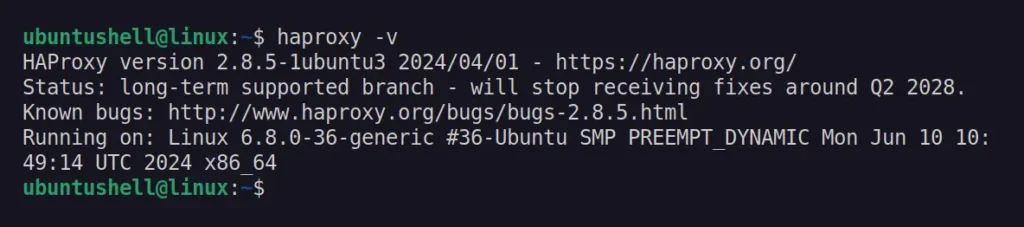
Step 4: Configure HAProxy
To configure your main server load balancing with other node servers, you must specify the information for the front-end server (which handles requests, primarily your main server) and the back-end server (which processes those requests; it would be your node server) in the "/etc/haproxy/haproxy.cfg" file.
Since you're a beginner, I'll aim to make it as simple as possible. First, open the HAProxy configuration file using your preferred text editor (I prefer Nano).
$ sudo nano /etc/haproxy/haproxy.cfgWhen it opens, you'll see a configuration like the one below, which you should ignore.
global
	log /dev/log	local0
	log /dev/log	local1 notice
	chroot /var/lib/haproxy
	stats socket /run/haproxy/admin.sock mode 660 level admin
	stats timeout 30s
	user haproxy
	group haproxy
	daemon

	# Default SSL material locations
	ca-base /etc/ssl/certs
	crt-base /etc/ssl/private

	# See: https://ssl-config.mozilla.org/#server=haproxy&server-version=2.0.3&config=intermediate
        ssl-default-bind-ciphers ECDHE-ECDSA-AES128-GCM-SHA256:ECDHE-RSA-AES128-GCM-SHA256:ECDHE-ECDSA-AES256-GCM-SHA384:ECDHE-RSA-AES256-GCM-SHA384:ECDHE-ECDSA-CHACHA20-POLY1305:ECDHE-RSA-CHACHA20-POLY1305:DHE-RSA-AES128-GCM-SHA256:DHE-RSA-AES256-GCM-SHA384
        ssl-default-bind-ciphersuites TLS_AES_128_GCM_SHA256:TLS_AES_256_GCM_SHA384:TLS_CHACHA20_POLY1305_SHA256
        ssl-default-bind-options ssl-min-ver TLSv1.2 no-tls-tickets

defaults
	log	global
	mode	http
	option	httplog
	option	dontlognull
        timeout connect 5000
        timeout client  50000
        timeout server  50000
	errorfile 400 /etc/haproxy/errors/400.http
	errorfile 403 /etc/haproxy/errors/403.http
	errorfile 408 /etc/haproxy/errors/408.http
	errorfile 500 /etc/haproxy/errors/500.http
	errorfile 502 /etc/haproxy/errors/502.http
	errorfile 503 /etc/haproxy/errors/503.http
	errorfile 504 /etc/haproxy/errors/504.http
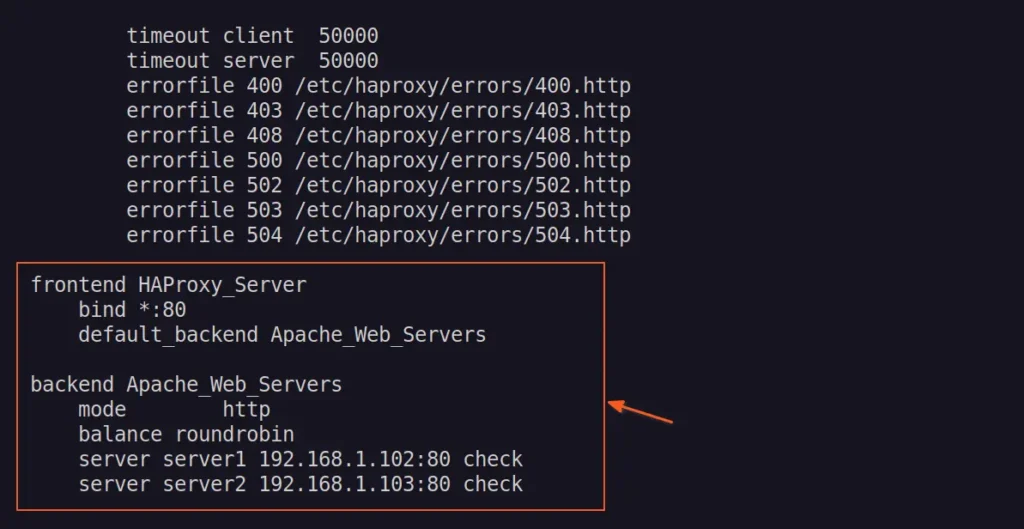
To configure the HAProxy main server to manage and redirect excessive traffic to two additional node servers (listening on port 80), simply go to the last line and copy-paste the following template, making sure you replace the node server details (highlighted in red).
frontend HAProxy_Server
    bind *:80
    default_backend Apache_Web_Servers

backend Apache_Web_Servers
    mode        http
    balance roundrobin
    server server1 192.168.1.102:80 check
    server server2 192.168.1.103:80 check
When you're done, this is what your file will look like:
Save and close the file.
It's a good idea to check the configuration file for syntax issues before moving forward.
$ sudo haproxy -c -f /etc/haproxy/haproxy.cfg
Step 5: Restart HAProxy
It's time to restart the HAProxy service to apply the changes made in the configuration file, and at the same time, we will also enable the HAProxy service to ensure it autostarts on system reboot.
$ sudo systemctl restart haproxy
$ sudo systemctl enable haproxy
Step 6: Check HAProxy Status
Finally, check the status of the HAProxy service to ensure it is running without any failures.
$ systemctl status haproxy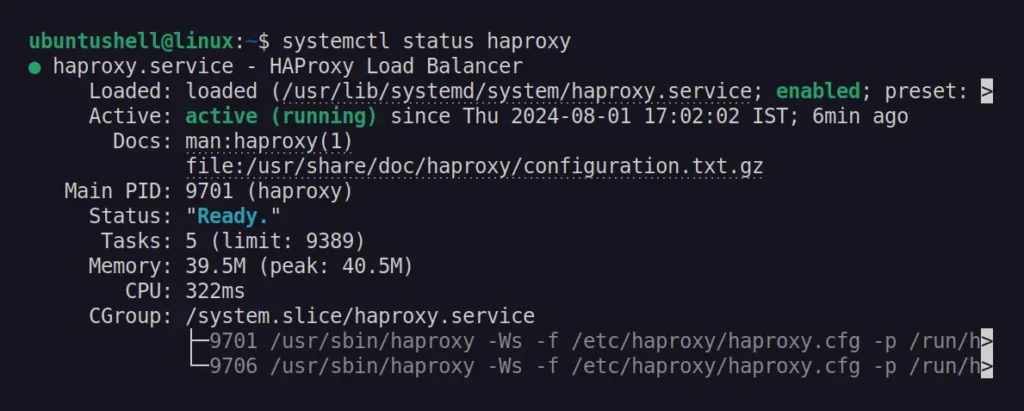
Step 7: Configure the Firewall (Optional)
Ubuntu comes pre-installed with UFW (Uncomplicated Firewall), so if you use it to protect your network, make sure to allow port 80 to enable HAProxy traffic on each server.
$ sudo ufw allow 80
$ sudo ufw status
That's it. Now you have your main server configured with HAProxy, which will handle all incoming traffic and distribute it among the two node servers based on their state.
Wrap Up
In this article, you learned how to install and configure HAProxy on Ubuntu for load balancing, but that's just the tip of the iceberg—there's much more advanced configuration you can do with HAProxy. For guidance, I highly recommend checking its official documentation page.
If you have any questions or queries, feel free to ask them in the comments.


