In this article, you'll learn how to install Apache on Ubuntu 25.04, 24.04, and other versions using package manager and source code, followed by how to configure firewalls, manage Apache services, and set up new virtual hosts.
What is Apache?
Apache is the most widely used web server in the world. Many popular websites, such as Adobe, Spotify, Samsung, etc., use Apache on the backend. It offers numerous features, such as dynamically loading modules, auto-indexing, IPv6 compatibility, robust media support, extensive integration support, and many more.
Despite its direct competitor, Nginx, being considered the best for high traffic and scalability, Apache's architecture can handle stable projects requiring more compatibility.
In this article, I'll guide you through various methods for installing Apache on Ubuntu 25.04, 24.04, and other versions, as well as how to configure and manage it for your personal or business projects.
How to Install Apache on Ubuntu 25.04 and Other
One can install Apache on Ubuntu via two methods: using the package manager, which is the easiest and recommended, or using the source file, which provides the latest version but may be inconvenient to manage.
Method 1: Install Apache on Ubuntu from Package Manager
Open your terminal, update your system, and then install the Apache2 web server on Ubuntu using the following command:
$ sudo apt update && sudo apt upgrade
$ sudo apt install apache2
Once the installation is complete, you can immediately access "localhost" on your web browser to check the Apache welcome page.
Method 2: Install Apache on Ubuntu from Source File
Once again, I must caution you that this approach is somewhat complex and not suitable for beginners. Now, when installing Apache2 on Ubuntu from the source file, start by visiting the Apache download page and downloading the compressed file.
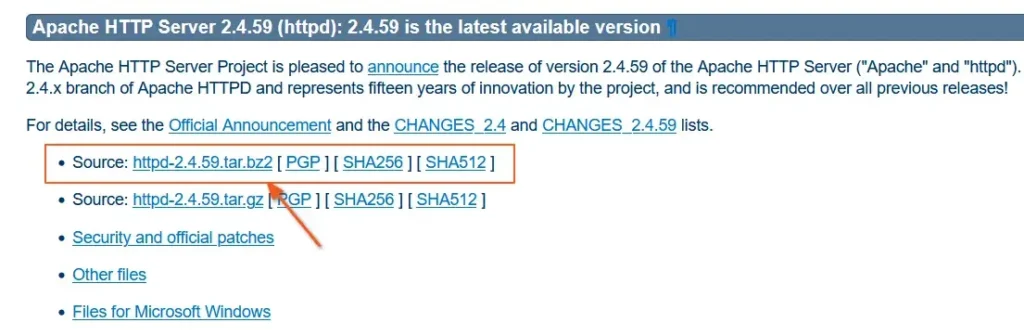
After the download completes, open your terminal, navigate to the download directory, and execute the following series of commands to compile and install Apache from source.
# The following are required dependencies to avoid APT error during installation.
$ sudo apt install build-essential libssl-dev libexpat-dev libpcre3-dev libapr1-dev libaprutil1-dev

# Uncompress the downloaded file.
$ tar -xf httpd-*.tar.bz2

# Move into the extracted directory.
$ cd httpd-*/

# Create a directory for Apache.
$ sudo mkdir /usr/local/apache2

# Configure the Apache to the created directory.
$ ./configure --prefix=/usr/local/apache2 --enable-shared=max

# Compile and install the Apache2 on Ubuntu from Source.
$ make && sudo make install
Once the installation is complete, you can use the apachectl command from the installation "/bin" directory to start, stop, and restart the Apache web server.
$ /usr/local/apache2/bin/apachectl start
$ /usr/local/apache2/bin/apachectl stop
$ /usr/local/apache2/bin/apachectl restart
If you encounter the following error while starting Apache:
AH00558: httpd: Could not reliably determine the server's fully qualified domain name, using 127.0.1.1. Set the 'ServerName' directive globally to suppress this messageAdd the ServerName localhost to the following file using your choice of text editor.
$ sudo nano /usr/local/apache/conf/httpd.confThat's it! You've successfully installed Apache on Ubuntu from the source file. Now, bear in mind that the upcoming methods shown in this article are for Apache installations done by the package manager. However, if you have a bit of experience as a Linux user, you can easily understand and adjust the parameters.
How to Configure, Manage, and Use Apache on Ubuntu 25.04 and Other
Let's look at how to configure Apache firewalls for increased security, manage Apache services using the systemctl command, and set up new virtual hosts to manage multiple domains.
Firewall Configuration
The Ubuntu system comes preinstalled with UFW, which you can use to allow HTTP/HTTPS traffic, including SSH, if you are managing it on a remote server such as AWS.
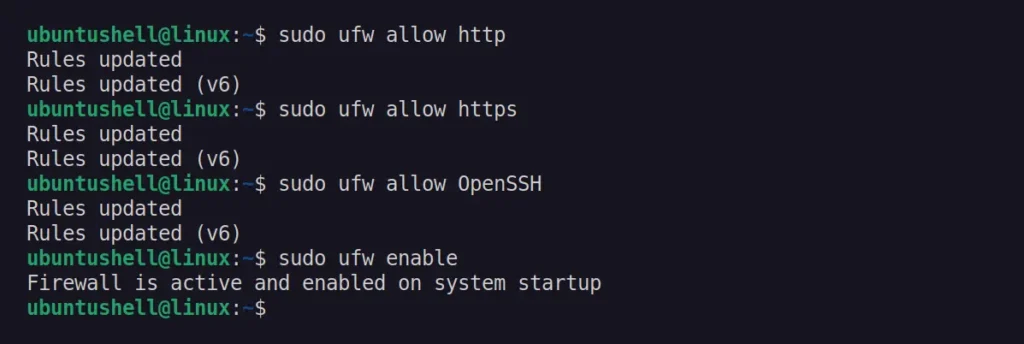
# The following command will allow incoming HTTP/HTTPS traffic.
$ sudo ufw allow http
$ sudo ufw allow https

# The following command will allow incoming OpenSSH traffic on the default port 22.
$ sudo ufw allow OpenSSH

# The following command will activate the UFW firewall, enforcing the specified rules to manage server traffic.
$ sudo ufw enable
Output:
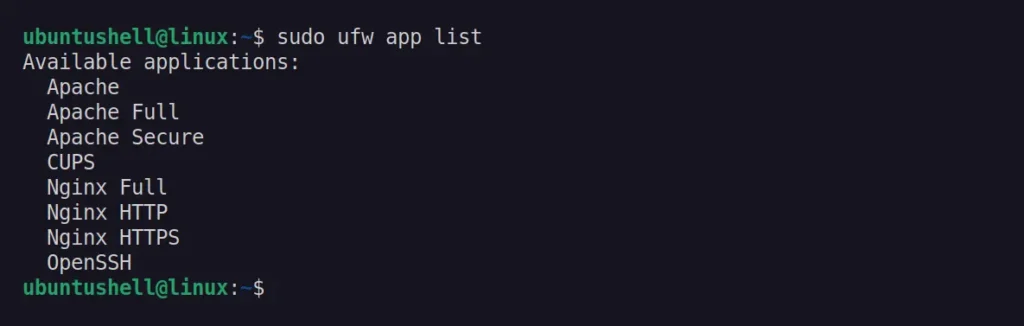
Finally, run the following command to list the UFW profiles and confirm the successful creation of the previously created profiles.
$ sudo ufw app listOutput:
Check Your Web Server
During the installation, the apache2 systemd service is automatically created and started. This service can be used to manage Apache on Ubuntu. Thus, to verify that it is running and set to enabled state (meaning it will auto-start on system boot), execute the following command:
$ sudo systemctl is-enabled apache2
$ sudo systemctl status apache2
Output:
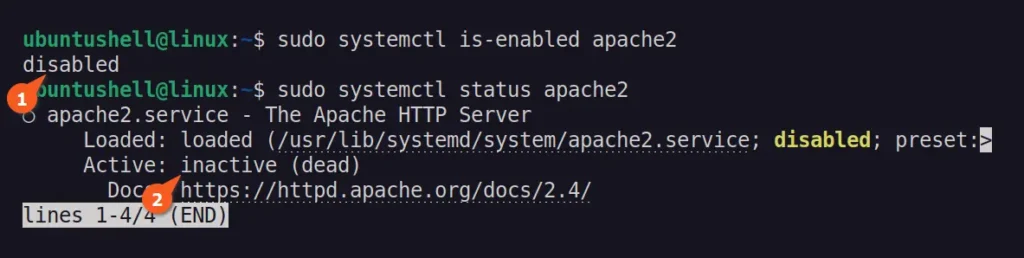
You'll notice that the Apache2 service is disabled and inactive on my system. To enable and start the service, use the following two commands:
$ sudo systemctl enable apache2
$ sudo systemctl status apache2
You can re-execute the previous two commands to check the status of Apache.
Manage the Apache Process
In addition to checking the Apache2 service, you can also perform several other actions, like starting, stopping, restarting, and reloading the Apache2 service. The differences among these options, including their command-line usage, are explained below.
# It will start the Apache2 service and occupy the default port 80.
$ sudo systemctl start apache2

# It will stop the Apache2 service and free up port 80 for others to use.
$ sudo systemctl stop apache2

# It will restart the Apache2 service with slight downtime, usually carried out when configuration changes are made.
$ sudo systemctl restart apache2

# It will reload the Apache2 service without any downtime, typically performed when minor configuration changes are made.
$ sudo systemctl reload apache2
Setting Up Virtual Hosts
When using Apache, you can configure multiple virtual hosts (similar to server blocks in Nginx) to encapsulate configuration details and host multiple domains on a single server.
In the example below, we'll configure the virtual host for "example.com" with the web host directory named "my_website". Alright, let's kick off by first creating the web host directory, creating an index HTML file, inserting content into it, and assigning user and group ownership.
$ sudo mkdir -p /var/www/html/my_website
$ sudo nano /var/www/html/my_website/index.html
$ sudo chown -R $USER:$USER /var/www/html/my_website/
To allow Apache to serve the content of the web host directory, it's necessary to create a virtual host file with the appropriate directives, thus, we'll create a dedicated virtual host file for our new web host directory.
$ sudo nano /etc/apache2/sites-available/my_website.confAdd the following configuration block to assign the domain to the created web host directory, ensure to replace the domain (highlighted in red) with your own or use "localhost".
<VirtualHost *:80>
    ServerAdmin [email protected]
    ServerName example.com
    DocumentRoot /var/www/html/my_website
    ErrorLog ${APACHE_LOG_DIR}/error.log
    CustomLog ${APACHE_LOG_DIR}/access.log combined
</VirtualHost>
Save and close the file, enable the newly created virtual host configuration file using the a2ensite tool, and disable the default site specified in 000-default.conf:
$ sudo a2ensite my_website.conf
$ sudo a2dissite 000-default
Test the configuration for errors:
$ sudo apache2ctl configtestIf the output returns Ok, then simply restart Apache to implement the changes.
$ sudo systemctl restart apache2You can use the domain (or "localhost") to access your website.

How to Remove Apache from Ubuntu 25.04 and Other
To remove Apache2 installed from package manager on Ubuntu, run:
$ sudo apt remove --purge apache2If you installed it using the source file, then remove the source directory from the system path.
$ sudo rm -rf /usr/local/apache2This article has come to an end. If you are accessing Apache on "localhost" and want to access it remotely, then check out our article on Bore.


